The Robin's Nest - Halloween

Bats and Ghosts and Pumpkins, Oh My!


I have to say...this Transylvania collection from The Robin's Nest has me in the Halloween spirit.  The glitter and graphics on the papers are awesome!  I came up with another fancy folded card today.  This one is a shutter-fold card.  You can find the basic layout for it here.  It was so much fun to make because I got to use a big variety of cardstock and elements. Oh boy!!! Here is my card:


I started out with my basic pieces and laid them out on the card base.


I then inked the edges of all the pieces so the white edges wouldn't show.


After all the pieces were adhered to the base, I started adding the embellishments.

Love the gauze ghost. And those Diamond Dew Drops make great eyes!
I cut out some webs from the Spiderweb cardstock and added some more Dew Drops.
A dangling bat with some Connie's Crystals adds some real dimension.
I added a purple crystal to the purple bat side...
...and a black one to the black bat side.
Thanks to Connie's Crystals for partnering up with The Robin's Nest this month.  They have some wonderful crystals on their site.  I urge you to check them out!

So one more peek at my card before I go....


Hope you all are enjoying creating your Halloween projects!  I know I am!  

Til next time, keepin' it crafty!

Supplies Used from The Robin's Nest Transylvania Collection:

Ghost Camo (used reverse side)
Halloween Stripe 

Purple Crackle
Spiderweb

Boo Words

Bats
Pumpkins


Spooky Dew Drops
Mascarade Dew Drops

Dew Dew Glue
Gauze Ghosts

Other Supplies Used:  
Connie Crystals
Adhesive
Silhouette Cameo

FCCB #179: Going Places

It's a bird, it's a plane, it's a.....BIKE?


Today's challenge on Fantabulous Cricut is to use some kind of transportation on your project. Since I've been on the go so much lately, I thought I'd slow it down a little and decided a bike would fit the bill.  I chose to do a card (I know, shocker!) and opted for "Thinking of You".

FCCB #179
Here is how it came together:

I selected the bike and frame from Heritage, and the grass if from Paper Dolls for Every Day.  I opted to cut the bike twice from two different colors so I could blend them together to get a two-tone bicycle. 
Once they were cut, I weeded out the images and "spliced" the two bikes together.
For the sentiment on both the front and the inside, I used the Jubilee cartridge and chose to use the amazing magnetic pen holder from Cri-Kits. These are very easy to use.  The holder is placed in the machine instead of the blade housing.  The pens just "snap" right in and are held in place with the magnet located on each pen.
This is how the Cri-Kit pen holder looks when properly placed.
I set the "cut" to two times to insure I got a good coverage with the pen.
I love the twinkly letters!! I simply cut the images to fit the placement on my card.
I used a marker to color the window chipboard from Gina's Designs.
I used a Sizzix embossing folder for the background and added some Flower Soft in Delphinium Blue to fill the bicycle basket with flowers.
I love the background and how quaint the flowers look in the basket.
The sentiment just pops with the Cri-Kits glittery gel pens. A little bit of twine finishes off the frame.
The inside of the card is simple, yet provides a nice finish to the card.
One more look:

I hope you are inspired to play along with us over at FCCB.  I also hope you check out Cri-Kits and the wonderful pen holders. They are a great addition to your Cricut.

Til next time, keepin' it crafty!

FCCB #178: ABC's/123s (Vinyl)

...and they lived happily ever after.

Well, the wedding was beautiful, and despite all the hiccups with the setup and decorating, everything came out fine and the happy couple are on their honeymoon.  And we can all rest easy now.


The challenge this week over at FCCB is to use vinyl with some ABCs and 123s.  Vinyl is SO easy to work with.  It cuts so nicely and, if you take your time, your projects will come out great!

My signature wedding gift....an "established" sign....became my project to share this week.  Since I was able to give my niece and her new husband my gift prior to this post, I am able to share it with you now.  (They loved it, by the way!)  Here is the project:

FCCB #178
(I discovered just how difficult it is to take a photo of a glass project. Wow!)  Anyhow, I love how the clear glass will enable this piece to match any wall color the couple chooses.  Their theme was kind of a lovebirds thing...bare trees and birds were prevalent throughout.  So I chose images to reflect that theme and am very happy with out it turned out.

Here is how it came together:

I chose a frame from Michaels.

I then laid out my images and text using the Cricut Craft Room. I used Gypsy Wanderings, Home Decor and Cricut Basic Font cartridges. a 12x24 Cricut mat and, of course, vinyl from cricketvinylsupplies.com.

When I have a large area to work with, I cut it into sections and work with one section at a time.  

Once I have the background removed, I start weeding out the other areas in between the letters.

After all the vinyl has been weeded, it is ready to be placed on the project.

The transfer film is placed on the image and burnished so that it will easily remove from the backing paper.

Image is on the transfer paper and ready to be placed on the project.

Once the images have been placed, it is burnished again, then the transfer film is removed, slowly, while keeping it close to the project base.  Note how the film is only held an inch or so above the glass. 

This shows the depth between the glass and the table top.  Just thought it looked kinda cool! lol

And there you have it!

Hope you like the project!  Time to head on over to FCCB and check out what the other Design Team members have to share with you!  But before you go......

Winner, winner!

It's time to announce the winner of last week's FCCB Blog Hop!

The random number generator selected #13, Janice, who said:
"Very nice project....love the message, too.
How lovely of you to offer blog candy! I am a brand-new follower by Google Blogger. Yippee!!!"

Congratulations, Janice!  I will be contacting you!

Until next time, keepin' it crafty!

The Robin's Nest: Halloween

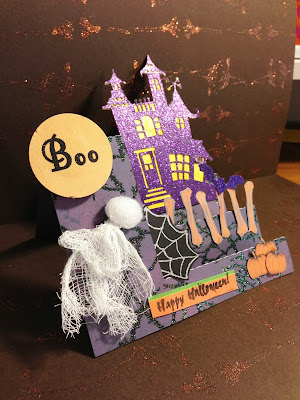
I'm back again to share with you an adorable Halloween step card. These cards are so darn much fun to make!!!  And with the AWESOME Halloween papers from The Robin's Nest, how can you go wrong?? Just LOOK!!


I started out with a step card base (Silhouette Design #397733)using the Purple Crackle Glitter Cardstock from The Robin's Nest.  

I then cut out the haunted house (Silhouette Design #13333) using some amazing purple glitter cardstock from TRN. I cut out a second image with plain yellow cardstock (minus the windows)to highlight the details. 


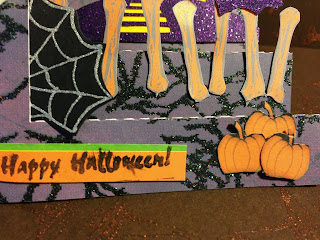
Then I fussy-cut several images from Orange Bones (the bones for the fence), Halloween Stripe (pumpkins and the banner for the sentiment) and Spiderweb (small spiderweb) cardstock and added those elements to the steps of the card. I added a glitter cardstock bat to the 

I used the Boo Words cardstock and a circle punch to cut out my "boo" moon and adhered that and the adorable cheesecloth ghost. Notice the wobble in the moon!


I love how this card came together.  Here are some different views which really show the details and dimension:


I hope you take the time to check out these awesome papers (links below). For a limited time, you can save 20% on select stock! I'm feeling the Halloween spirit and can't wait to get started on my next project! 

Til next time, keepin' it crafty!

Supplies Used:

The Robin's Nest Cardstock:  Purple Crackle, Halloween Stripe, Orange Bones, Boo Words, Spiderweb, http://robinsnest-scrap.com/index.php?main_page=product_info&cPath=128&products_id=1742Witch Accessories (photography background); Chipboard Bats.

Other supplies:  sentiment (SU!), circle punch, Adirondak Ink, Glue Dots, glue, Silhouette Cameo.

Saturday Sketch Challenge #748

Happy April, Crafting Friends! I hope your month has started out good and continues in a positive way.  I'm back today with another proj...