FCCB #158

PAPER ROSES

That reminds me of Marie Osmond.  Except when I was younger (much, much younger), I always thought she was singing "Paper Rosy".  When I think about it, there were a lot of songs I didn't really know the right words to.  But I still sang them at the top of my lungs.  Still do.  LOL

#158 Paper Roses
After all the craziness this week of working full-time, doing home remodeling (my mom is moving in next month and we needed to make some rooms "handicap accessible" as she uses a walker), getting our seasonal site at the campground cleaned up, cleaning up the flower beds and yard at home, my granddaughter's third birthday party and trying to keep up with 7 dogs, I've been a little bird brained.  Can you understand why?  I'm so glad I HAD to spend some time in my craft room for this challenge.  More than just meeting my timeline for the Design Team, I needed the peace and quiet and craftiness that I get from spending time in my little Craft Room.  It is my therapy.  It is my zen.  I can close the door and the world disappears.  All that I have to think about is creating.  Woosah.

So with my bird-brained mentality, I naturally had to have something bird-related on my project...a card.  Shocker, I know.  I love doing cards.  They are tiny masterpieces that don't take a long time to perfect.  They're perfect for the tiny amount of time I have lately.  I can complete one project in a sitting and still get that sense of accomplishment and joy.  And the bonus is, someone else will get to enjoy it at some point when I send it away.

And this is my card.


I used white cardstock as the base and a beautiful tangerine for the layer, which was embossed with one of the new Anna Griffin's Cuttlebug Embossing Folders called Poppy.  The bird and birdcage was cut from the Bloom cartridge, and the leaves were cut from Cricut Essentials.  I actually think they are supposed to be flowers, but I rather liked them as curly leaves and they matched the curly legs on the birdcage so nicely.  

The sentiment is from a Stampin' Up! set called Happy Harmony.  I mounted it on a chipboard tag and added a couple of pearl embellishments.  The flowers I have actually had for years and have no idea who manufactured them.  I inked a little bit on the white flowers and added pearls to all the centers.  I was going to use the Cricut to cut out some flowers since there are such a wide variety of them available, but in the interest of time (not to mention I have no patience lately), I decided to use what I had on hand, and they were a perfect fit.

Here are a couple of close-ups.


That last one really shows the beautiful detail you get from the Anna Griffin embossing folders. And some of the ones she does are larger so I could easily do a 5x5 layer in them.  I love that.

As I'm writing this on an early Sunday morning, I am listening to the carpet guy slamming staples birds singing and watching the crappy rain beautiful sunrise and squirrels and bunnies playing in my yard. All is right with the world in my little corner of the house.  I'd really like to just stay here all day, but, unfortunately, I hear rakes and dishes and bathroom walls calling my name.  At least I got to enjoy a few minutes of woosah.

Til next time, keepin' it crafty!

FCCB #156

April Showers Bring May Flowers...


So why did I see it snowing this morning?  Ugh!  Thankfully it didn't stick and it reverted back to rain.  Things are starting to green up around mid-Michigan, but I have to say I am over all the rain.  I sure could use some sunshine!

Over at Fantabulous Cricut, the challenge is April Showers.  Here is my Design Team card.

FCCB #156
I used cuts from Create A Critter and Create A Critter 2 and the marvelous Cricut Cardstock (I LOVE this stuff!).  The rainbow was hand-drawn and the sentiment printed on Dymo tape and mounted on some washi.  Here are a couple more close-ups:


And the inside:


The font I used was LD Whatever.  I dig this font!

Check out all the cheery umbrella inspiration from the Design Team Members over at FCCB and play along!  It's better than looking at this gloomy rain, right?

Til next time, keepin' it crafty!


Cricut Cartridge Storage

My Never-Ending Quest for the Perfect Storage Solutions


I have redone it and redone it. But I'm closer each time. I'm talking about my craft room supply storage. I swear I spend as much time organizing and reorganizing as I do crafting. Can you relate?

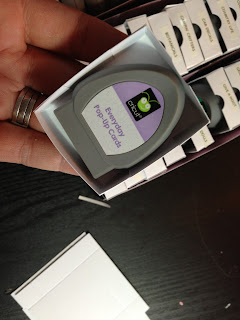
As I was moving my craft room, I had condensed my Cricut and supplies down to a 2-drawer wheeled printer cart, which seems to be working perfectly.  I moved my handbooks from my cubes to photo boxes in my Cricut cart. I "deboxed" the cartridges previously and made little trays for the carts for the new Cricut cart, but I just wasn't quite happy with that. 


I made little labels which I intended to just stick on the tops of the carts and be able to identify from the top which cartridge was which. Yeah, that didn't work.  The labels did not want to stick to the curvy cartridge tops. So I had to come up with another plan.  {LIGHT BULB MOMENT}

I made up some tiny little boxes that the cartridges fit in and applied the label to the top so I could store them in my CriCart (clever, eh?). The boxes fit into my flimsy trays, but they were still flimsy. So I decided to redo the boxes using some sturdy cardboard. Perfect-o!


The storage trays are 6"x11", scored at 2" on all sides. The tiny boxes are 3"x3.5", scored at 5/8" on all sides.


Now, all I have to do is cover the ugly cardboard with something pretty...I'm thinking pink zebra duct tape. I even made a few extras so I have room to grow.  

Well, that's my quick little blurb for the day. Off I go to finish up that craft room move (SO close to being finished!).


Til next time, keepin' it crafty!


I've Been A Busy Girl!!!

What I've Been Up To...

For the past couple of weeks since returning home from vacation (hubby and I celebrated our 25th anniversary [last year] by going on a cruise [this year]), I have been diligently working around my house.  My daughter, son-in-law, and two granddaughters finally got their house finalized and moved the weekend we came home.  And my 80 year old mom is going to be moving in very soon, so we have a LOT of redoing to do!


First up, 

I decided that since I live here 24/7 and we have guests only a few times a year, I should have the bigger of the two spare rooms for my craft space.  I have been packed in my teensy room (without much complaining) for a long time.  It's amazing how much stuff one accumulates over the years.  Luckily I knew a couple scrapbookers who are more than happy to take the excess off my hands.

I had a plan of how we needed to accomplish the move...Hubby painted and helped me move a couple of pieces from my mom's house into my room....and I worked on the rest.  And worked.  And worked.  And worked.  And am still working.  Wow!  I had no idea in my little brain that it would take this much WORK!  But that was the deal I made ("But, Honey, all you have to do is paint and move two pieces of furniture and I will do EVERYTHING ELSE!")  What was I thinking! But I'm about 95.3% done now.  Just need to figure out what to do with the extra crap important items I haven't fit in the new room yet.  I can almost see the floor of the old room.  lol

Here are a couple of pics of the old room as a reminder of how much I had crammed in there. Mind you, every single cabinet, basket and drawer is FULL!


Didn't I tell ya?  A lot of STUFF!!!

Here is the new room, 95.3% done. (And I have several drawers and baskets that are still empty.  Hoping to get a couple more drawers cleaned out and condensed when I have more time.)


Fish Eye Looking Into the Room (Taken with my fish-eye lens for my iPhone)


The walls are a soft grey and I kept all my pink and orange storage from the previous craft space which adds a really nice pop of color without overdoing it.  Now I just have those pesky little things from the other room to put away yet and I will be done and can get back to my passion of crafting!  Oh, how I've missed it.  WEEKS I've been working on this!


Next up,

I got a new toy piece of very important equipment....A Silhouette Cameo!  And my first cut?  The "designer" control panel.  Pretty darn slick if ya ask me!  Cannot WAIT to get to play with it some more.  Check this out!


Now all I need to do is find time to play with it and make beautiful things!  That is, after I finish cleaning out the old craft room, mudding and painting it, painting my mom's new bedroom, repainting the living room since there seems to be a lot of unexplained chips out of the wall (they weren't there when the kids moved in!), and creating a utility room so Mom can access the washer and dryer.


Also,

I have been playing around with revamping my blog a little.  Finally figured out how to do a header.


It's not perfect, but it's a start! Once I get it how I really want it, I will move on to figuring out how to do my very own blinky.  I have zero money to spare with all the remodeling I need to do (not to mention the Cameo...thank goodness for flex pay), so I am determined to accomplish this on my own.  (Of course, by the time some of you read this, I will have already changed the header numerous times! lol)


And finally,

I reorganized my Cricut supplies and condensed everything down to one cart that I can roll to wherever I choose.  I used a couple of photo boxes for the manuals and overlays, and I created a few "holders" for the cartridges. (I used to have them in one of the stacked drawers). I just need to print out the labels for the tops of them for easier identification.  What do you think?


Hope you enjoyed my "shares" for today.  But for now, I have a terrible backache.  Time to take a break and hug a chihuahua.  Next week I will have more ditties to share with you, including something for the FCCB Design Team.

Til next time, keepin' it crafty!

Saturday Sketch Challenge #748

Happy April, Crafting Friends! I hope your month has started out good and continues in a positive way.  I'm back today with another proj...